Monday, February 23, 2015

Playing the Mount Whitney Lottery: Part I

Revision for 2016:

 Due to scheduled construction work on Whitney Portal Road, the "walk-in" permit program may be heavily curtailed or cancelled entirely if parking becomes an issue.  Otherwise, all other aspects of the permit process remain as described in this 2015 post.  Call the Eastern Sierra Interagency Visitors Center for more details as the summer progresses.  Now to our regularly scheduled post already in progress...

Don't forget your Whitney Portal campsite reservation if base camping at altitude is part of your plan (and it should be)

To climb Mt Whitney from the traditional eastern approaches, one must submit oneself to that little piece of paradise we like to call the Mount Whitney Lottery.  For most people wishing to climb the most typical routes, the lottery is the surest bet to having a permit reserved for their party.

The Lottery was created a while back as a fair method for limiting the amount of environmental damage caused by the mostly well-meaning hoards unwittingly loving the place to death.  The campsites were in danger of becoming high altitude cesspools, the marmot population exploded, and some marmots themselves actually exploded after gorging on junk food stolen from unsuspecting backpackers.

Bear can requirements helped control the marmots (not to mention the bears) but something had to be done about spreading out the folks who wished to climb.  Before the lottery, 90 percent of the climbers showed up on weekends.  It was a bit of a madhouse.  A very trashy madhouse at that.  So the lottery not only limits use, it spreads the usage out evenly across the whole week.

The Lottery permit period starts on February 1 at midnight EST.  Subtract an hour for every subsequent western time zone.  That means 9:00 pm by the time we arrive at PST.  The period ends at 11:59 pm on March 15.  Again subtract an hour for every time zone going west.  That means everyone has the same start and finish time no matter where they reside.  Here's the blow-by-blow:

All Mount Whitney climbing reservations get handled at recreation.gov.  One can also use this website to reserve a campground at most national parks and forests.  The site takes reservations for backcountry permits as well.  If you love the outdoors, chances are you already set up your free account.  If you don't have one, spend five minutes and you will.  Split your screen into two windows and pull up Mt Whitney Quest again so you can click on the above screenshot in one window and get a good look while reading these instructions in the other one.

Shown above is the recreation.gov homepage.  Once signed in, enter "Mt Whitney" into the white search box.  You'll see some pre-selected results drop down from the search box.  Choose "Mt Whitney, Inyo National Forest" from the results then select "Permits & Wilderness"  from the drop-down "Interested In" menu.

Just above the "Check Availability" button in the first result marked "A," find the two links for "DAY USE of Mt Whitney Zone" and "Mt Whitney Trail Overnight Permit."  Click the appropriate link.  If you're not sure about your trip type, find the blog posts comparing single-day and multi-day trips.  One caveat:  The lottery is cobbled together from their normal website code which is cobbled together from God knows what.  Clicking as directed will get you where you're going.  If you stray off the path here, you may be lost forever.

If taking a single-day trip, you'll get the result shown above.  You multi-day-ers hang on.  We'll get to you in a sec.  Click on "Mt Whitney Zone - Day Use All Routes"

The two screen shots above are actually the same page.  The lower shot is a scroll-down from the upper. Start by using the first two drop-downs and seeing the results as above.  Next, add your permit entry date.  Note:  The date on your permit is the date you plan to enter the Mt Whitney Zone and summit Mt Whitney.  Set your permit size.  No more than 15 people can be grouped together regardless of the number of permits. Set your exit point as above.

Note the box marked "Alternative Choice 1." Fill out an alternative date and finish as with the first box.  When done, click on the link below it called, "Add Alternate Choice (You can add up to 15 choices)."  Fill in as many choices as you can before you're choiced out.

Moving to the lower shot, fill in your trip itinerary using the drop-down box.  Indicate "Mt Whitney Trail" (the main route).  Choose "North fork of Lone Pine Creek" if taking a one-day trip up and down the Mountaineer's Route.  Note:  Multi-day trips up the Mountaineers Route are a completely different permit setup.  This is for single-day attempts only.

Next, indicate your alternate leaders.  This is extremely important.  If you can't make the trip due to illness or whatever, and you don't appoint alternate leaders, then your permit is dead.  Only leaders or alternate leaders can pick up permits from the Eastern Sierra Interagency Visitors Center in Lone Pine.

Check the Terms of Use box.  Then go back and make sure everything is in order before continuing to the shopping cart.  If you miss, you'll get a warning and have to go back to complete the application properly.  Failure to do so either scrubs out all your info or double bills you as you resubmit.  Also, check your preferred entry date because it occasionally defaults to May.  Whatever you do, don't hit the "back" button.  You will cause the Earth to wobble on its axis and be catapulted into space. There is a place to clean up your bill before paying without causing global catastrophe. Look for  "Remove Marked Items" in the green bar below the words "Shopping Cart."  Click on it only after checking off the duplicates.

Your final application should look like this.  It won't show all your alternate dates.  At this point, all you owe is the $6.00 non-refundable application fee.  You do not pay $15.00 per person until you accept your date assignments.

 I know you guys can take it on home from here.  Now let's see how the multi-day trip differs:

After clicking on the "Mt Whitney Trail Overnight Permit" link from the search results page, it should look like this.  Click on "Mt Whitney Trail JM 35."

On a multi-day trip, the date listed is the day you plan to enter the John Muir Wilderness (about .9 mile from the trailhead), not the Mount Whitney Zone which starts about a hundred yards up the trail from Lone Pine Lake.  Camping at Lone Pine Lake also requires a multi-day permit, hence the difference in boundaries from the single-day permit.  The application looks pretty much the same except for the size of the exit-point drop-down menu.  Since this is a multi-day trip, the options aren't just limited to different days.  You can vary the exit points as well.

If you're taking the standard trip in and out, select "Mt Whitney Trail JM35" as both entry and exit points.  Also, indicate your exit day (hidden behind the drop-down) With a multi-day permit, you have as many as 13 more days in the Mt Whitney Zone but you must declare your intention to do so.

If your multi-day trip begins anywhere other than The Mt Whitney Trail, that's a different permit altogether. You will not be part of the lottery.  You will be part of the normal backcountry permit system, which allows applications for permits six months to the day in advance of their trips.

Planning a south-to north trip on the John Muir Trail?  Not only is your backcountry ingress regulated (via the Mount Whitney Lottery), your egress at Yosemite now has a quota as well.  Could be a drag if they don't let you stop. Check with the Yosemite authorities for information.


Do everything correctly and the above page is your reward.  If you had to go back to re-do something, the application fee may be double. Find the link called "Remove Marked Items" in the green bar just below the words "Shopping Cart."  Click on it after you put a check mark next to the duplicate entries.

Need more info?  These fine folks at Inyo National Forest can help. (760) 873-2483.

 Check out Part II of "Playing the Mount Whitney Lottery" where we discuss strategy, facts figures, and other need-to-knows.

Like Mt Whitney Quest on Facebook 


Thursday, January 29, 2015

Mt Whitney for the Sedentary

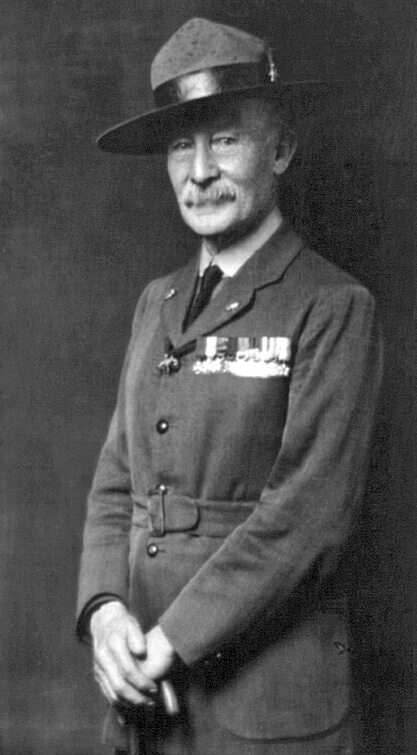
Or:  Thank You Lord Baden-Powell

Public domain photo courtesy of Wikipedia
Father of Scouting.  Unwitting Re-Animator of the Sedentary
Many aspiring Mt Whitney climbers must first climb off the couch or make the transition from light exercise to the type of training necessary for increasing their odds of a successful climb.  My own enforced idleness got me thinking about a strategy for helping others in the same boat.  This is where we thank Lord Robert Baden-Powell, father of the Scouting movement.

Last April, I started running again after being forced to lay off for 11 months due to a really painful case of plantar fascitis.  To prevent injury, I started easily, running a mere one mile a day.  After having worked up to two miles, I pulled my calf muscle.  Then I pulled it again.  Then I pulled it again.

"Try fast walking instead of running to rehab the calf," I thought.  So I did.  Then I pulled a hamstring.  While walking. Total humiliation.  Despite my 40-plus running years, I learned one cannot jump-start a 58-year-old bod from zero and expect to be back in shape in a week.

Actually, I did know that.  However, I am still surprised over how long everything takes at this age.  It doesn't matter how many years I ran.  When I'm forced to lay off and start from scratch it's like I never ran a step in my life.

Back in my day, (am I old enough to use that phrase?), our Scout Handbooks discussed Boy Scout Pace.  The idea was to alternate running 50 paces (a pace being two strides) with walking 50 more.  Good practitioners could travel 12 minutes a mile or five miles per hour for quite a long time.  In a past article I wrote the minimum cardiovascular fitness for a successful, safe Mt Whitney climb was running a minimum of five miles in an hour for the month before the trip.  That's not a coincidence.

Photo by Charles Hirsch, Consultation Lake
Consultation Lake, Arc Pass, Mt McAdie, and Louie Malvaez (Charles Hirsch photo)

By applying the principle behind Boy Scout Pace, I fiendishly devised a method for returning sedentary bodies back from the dead.  The walking interval lowers the running intensity so the body can adapt at its own pace.

In practice there are a few different ways to apply the method.  After awhile, counting paces drives me nuts.  How about counting telephone poles instead? Or light poles? Or trees planted along a street?  Or houses?  What if you started by running two poles, then walking two?  Then three and three?  Then four and two?  You can use the principle to put together larger and larger blocks of solid running.

Boy Scout pace also allows the trainee to stay out longer initially but with less intensity.  So that one mile of running turns into a mile of running and a mile of walking broken into smaller parts.  Eventually, you will run the whole distance, having strengthened your tendons and ligaments slowly instead of falling into a train-and-injury pattern.

I used this method to allow everything to get used to moving in concert again.  I weaned myself off the walking parts slowly until I could run three or four miles (5 to 6.6 km) solidly.  If I can run that far, I can run six miles (10 km)-plus. Eventually.

Thanks, Lord Bobby.  Hello to the wife.

Like Mt Whitney Quest on Facebook 

Wednesday, January 14, 2015

Mt Whitney Dirty Dozen Hike 1: Malibu Creek - Backbone Trail "Walkabout"

In my never-ending quest to provide you, dear reader, with all the information you need to succeed, I hereby provide these hike "spotlights" on certain Mt Whitney Dirty Dozen hikes that you, dear reader, ask about repeatedly.


A lot of folks write or ask me at clinics about Hike #1.  They can't find the trailhead or it's hard to follow the trail itself.  The guidebooks are a little vague on the particulars as well so my wife Robin (our photographer du jour unless otherwise credited) and I headed out to document the hike's beginning.  Or the end, if you decide to do it counter-clockwise.

I'm a rebel...

 Personally, I like to hike this loop clockwise.  The trail climbs more precipitously but I'd rather go up more steeply than down.  Hiking counter-clockwise means more total miles climbing but at an easier grade.  I just like the way it plays out better clockwise.  Plus, you're not staring into the sun while traveling on top of the ridge
(Natalie Moore photo)
However, it is easier to start counter-clockwise by parking in the main lot and following the "Backcountry Trails" signs.  After those, follow the signs for the old M*A*S*H TV show set (now somewhat restored).  A guidebook can take you the rest of the way. Towards the end, consult the pics below and follow the directions backwards.

If you want to do it my way, follow along as Robin and I get you started on a grand day out in the beautifully sublime Santa Monica Mountains.  You'll be gawking at the most expensive real estate in the world as well.

(Natalie Moore photo)
The main entrance to Malibu Creek State Park lies just south of the Las Virgenes Road - Mulholland Highway intersection.

First obstacle to negotiate is the entrance kiosk where your wallet will be lightened to the tune of 12 bucks for parking.  Try convincing the ranger you're a senior for a one-dollar discount.  Using words like "World-Wide Web," "MySpace," or "Flip-Phone" will probably work.

UTM 11 S 0342041 E  3774630 N  WGS 84
 You can choose to park in the main lot and hike this road  to the trailhead or stay in the car for a short minute and park next to it.  The hike ends at the main parking area so take your pick.  If going counter-clockwise, follow this crosswalk, then the signs indicating the trail.
UTM 11 S 0341605 E  3774169 N  WGS 84
  Driving or walking, do not miss this right turn.  Follow the sign toward the group camping area.
UTM 11 S 0341694 E   3773959 N  WGS 84
Follow the now-dirt road to this parking lot.  Park here or cross the lot to the far (northeast) corner to the gap in the railing.  That's the trailhead.
UTM 11 S 0341901 E  3773766 N  WGS 84

Close-up of the trailhead.  Don't know if the spigot in the center works.  Bring plenty of water, sunscreen and a hat on this one.  This hike will burn you even on a cloudy day.
UTM 11 S 0341932 E  3773760 N  WGS 84

You are now on the Tapia Spur Trail in the oak-and-grass country covering large areas of CA.

First glimpse of Camp Gonzales, a juvenile detention center.

Closer in, one can make out the walls, fences, and razor wire.


Welcome to the Backbone Trail.

The trail forks past the detention center after some descent.  The left fork is prettier, the right fork more direct.

Left-forkers will find this footbridge.  Turn right on the road after the bridge.

The trails converge at the gated entrance to Tapia Park.  Skip the road and pass between the two yellow posts to walk the trail paralleling the road.
UTM 11 S 0342162 E  3772866 N  WGS 84

A good time to work on our poison oak identification.  Robin's photo shows three manifestations of the same plant.  It's active no matter what color or how glossy.  Leaflets three, let it be.

Leave the trail and regain the now-dirt road for an area I call the Tunnel of Trees.  Oak trees inhabit the left side of the road, sycamores on the right (creek) side

Upon reaching this gate, do not follow the paved road.  Stay to the right instead.

Look for a small picnic grove next to the paved road and a small parking area.  These two picnic tables are the only ones of their type in this small grove.  Pass to the left of the two tables and follow the trail to Las Virgenes Road.  Or, for a more scenic route, pass to the right of the two tables and follow the trail to a tee intersection.  Turn left and head towards the auto bridge.  Pass under the bridge and follow the trail until it reaches Piuma Road.

If you went left, cross this intersection and cross the bridge behind the guardrail on the left-hand side.  Right-goers come into the picture from the left side of the parking lot pictured, having already crossed under the bridge.  Avoid crossing the bridge in the right-hand lane.  There is no protection from cars going 50-60 miles per hour.


Re-cross the road again (end up on the right side) to enter this parking lot not too far from the other side of the bridge.  The next trail section starts in the middle of the lot.

Just outside the photo on the right side is a sign that reads "Trail" with an arrow pointing directly at the Port-A-John.  I assure you nothing good can come from following that arrow.

Instead, walk about 100 feet past the Port-A-John, then by a closed, mouldering "permanent" restroom and find this sign. Enjoy the next 1,600 vertical feet on your way to the Mesa peak Motorway. 
UTM 11 S 0342758 E  3772357 N  WGS 84
A good guidebook will get you around from here to the trail's end at UTM 0341643 E 3774178 N where a soda machine sits for your drinking pleasure.  You still have to drive home so don't get nuts drinking Cactus Cooler.

Now for all you conformists......

If you're traveling counter-clockwise around the loop, the Piuma road intersection looks like this.  You can cross the street here and head into Tapia Park but where's the fun in that?  Instead, turn right on Piuma road and look for the trail past the end of the parking lot.  Follow the trail under the bridge, then take take the right fork when the trail diverges.  The road less traveled.

Go through the yellow gate to the Tunnel of Trees, then look for the trail on the right just before the road you're following turns back into pavement.  Go through the aforementioned yellow posts, then look across the road to find this sign.  Follow the arrow, go past the detention center and follow the above directions backwards.  Easy, right?


I love this 14.5-mile jaunt.  My wife Robin loves it.  My stepdaughter Natalie did it four times in one month alternating directions around the loop.  Completing this hike in six hours or less (including lunch and breaks) means your basic conditioning is good enough to get serious about Mt Whitney after completing the hiking and running programs I've outlined in many previous posts.  If you struggle to complete this hike in the allotted time, consider taking a year to condition yourself to ensure a successful Whitney climb. Believe me, it will still be there when you're really ready.

(Natalie Moore photo)

 Like Mt Whitney Quest on Facebook

Monday, January 13, 2014

Mt Whitney Class January 29, 2014 AD (Free)

Behind this imposing edifice lies the finest Mt Whitney class in its price range
I will be holding an REI Outdoor School class for climbing Mt Whitney on Wednesday, January 29 at REI Northridge, 18605 Devonshire Street in fabulous Northridge, CA.  Call (818) 831-5555 and make your reservation now or follow the link above and find the class in the class list.  We'll have a full house so get 'er done.  I'll cover everything from permits to preparation.  Pictures and everything.  It will be funny.  Come on down!

Mount Whitney Class January 22, 2014 AD (Free)

The thing to do on Jan 22

I will be holding my first REI Outdoor School class for climbing Mt Whitney on Wednesday, January 22 at REI Arcadia, 214 N Santa Anita Avenue in fabulous Arcadia, CA.  Call (626) 447-1062 and make your reservation now or follow the link and find the class by date in the Arcadia class list.  This class fills up quickly so get 'er done.  I'll cover everything from permits to preparation.  Pictures and everything.  It will be funny.  Come on down!

Wednesday, January 1, 2014

Tuesday, December 31, 2013

Running and Climbing: A Proven Recipe for Mt Whitney Success - Part III - Use a Heart Rate Monitor

Heart rate monitors provide valuable feedback whether we're in our running or climbing phases.  Knowing our heart rate makes training time as efficient as possible.  Here's how:


Meme courtesy Robin DeCapua

There are two basic training modes; aerobic and anaerobic.  The former literally means "with air" while the latter is the opposite.  Training aerobically means the body's demand for oxygen does not outstrip its ability to supply it.  Aerobic training runs are longer and less intense.

Anaerobic training refers to a specific ability to do work in the absence of oxygen, commonly referred to as "oxygen debt."  Anaerobic training runs are shorter and far more intense.  Interval training on the track and repeats on hills are two examples.

For our high-altitude purposes, we're relying on the running to improve our oxygen-carrying capacity.  Running at certain intensities improves the whole system by strengthening the heart muscle and creating a larger network of capillaries probing deeper into muscle tissue.  We achieve this goal more efficiently by using the heart rate monitor and capping our maximum heart rate while remaining "in the zone" for longer periods.

Say Hello to Aerobic Max

Depending on our age and physiology, each of us has a maximum aerobic potential.  Generally, aerobic max lies around 75-80 percent of our maximum heart rate (you can find your rough maximum heart rate for training by subtracting your age from 220).  If you are overweight or sedentary or both, your aerobic max may be lower, at least for now.

A warning before we go further:  Consult your physician before embarking on any training regimen.  Also, trainees may require less intensive training to work up to their maximum aerobic potential.  Being more ambitious than your body's ability to adapt is a well-worn pathway to injury so ease into it.

Chart courtesy Wikipedia

For most of the population, the heart rate for maximum aerobic potential lies somewhere between 130-160 beats per minute.  Use the chart above as a guideline, at least to start. Training near maximum aerobic potential creates the maximum amount of blood volume and pressure, thereby forcing capillaries deeper and deeper into muscles.  The more we develop our capillary network, the easier it is to provide working muscles with oxygen and glycogen.  Having an underdeveloped circulatory system starves muscles for oxygen and glycogen just as sure as trying to eat by sucking a turkey through a straw.

Running at sustained levels above maximum aerobic potential creates two major problems.  First, the heart beats so rapidly, the valves slam shut before the chambers are full so the overall volume and pressure go down.  Second, lactic acid forms in the muscles in the absence of adequate oxygen supply.  Slowing down allows us so achieve our stated aims; improving cardiovascular efficiency and maximizing training time.

Mount Whitney Training
We use the heart rate monitor to ride herd on ourselves. For our purposes, even the simplest monitor will do.  I use a Polar FT1 retailing for $59.95.  The display shows heart rate while in training mode.  I can set maximum and minimum heart rate alarms.  Set them at least five beats above your aerobic max, otherwise you'll go crazy with the alarm beeping.  Afterwards, I can see my exercise time plus max and average heart rates.  That's it.  So don't break the bank needlessly.

Also, my heart rate monitor uses a chest strap transmitter.  In my opinion, non-chest-strap monitors are a waste of money.  Some require stopping for 20 seconds while placing a finger on a pad.  Save your money and take your pulse instead.  Others don't get the finger but they are still inaccurate.  A monitor with a chest strap is plus-or-minus one beat-per-minute accuracy no matter the price or manufacturer.  You'll get over the strap in about 30 seconds.

The Moving Threshold


Above 10,000 feet, my "aerobic threshold" drops about ten or 15 beats.  That's why I advocate using the monitor while climbing as well.  If I exceed my adjusted threshold, I get about 20 minutes before my legs are smoked.  No amount of rest stops will revive them for long.  Five or ten beats below my aerobic threshold and I can climb until next Tuesday.  Having said that, sometimes I induce oxygen debt on purpose during training climbs for short stretches to increase my anaerobic capacity.  More on that in the future.

We are all "prisoners" of modern life.  We are all busy and oversubscribed.  Get the most from your valuable training time.  There is no excuse for neglecting your training.  Others are counting on you.  Give yourself the best possible chance to summit.  Start now and adapt.  Climb.  Run.  Monitor.  Succeed.  Enjoy.

 Like Mt Whitney Quest on Facebook